How to Test Gold Purity With Confidence
So, you need to figure out how pure your gold is. The first step is deciding how you are going to test it. You have a few paths to choose from: quick home methods, more reliable chemical kits, or the gold standard professional services.
For a fast, preliminary check, something as simple as a magnet or a density test at home can give you some clues. If you need more certainty, an acid kit is a classic for a reason, it gives a pretty reliable estimate. But for the highest precision, nothing beats a professional XRF analysis.
A Snapshot of Gold Purity Testing
Deciding on the best way to test your gold really boils down to your goal. Are you just casually sorting through a box of old jewelry you inherited? Or are you about to buy or sell a high value investment piece?
The method you pick is always a trade off between accuracy, cost, and convenience. Some tests are quick and free but only tell part of the story. Others give you pinpoint accuracy but come with a price tag.
For example, the magnet test is a great first step. It costs nothing, takes about five seconds, and can instantly weed out fakes made with magnetic metals like iron or nickel. But it is not foolproof. It will not catch counterfeits made from other non magnetic metals. It is a good screening tool, but it is definitely not the final word.
Understanding these nuances is the key to picking the right approach. After all, the level of certainty you need for a family heirloom is a world away from what a professional coin dealer requires.
Choosing Your Testing Path
To make this a little easier, think of it like a decision tree. This visual guide can help you match the right testing method to your specific situation, whether your needs are casual, serious, or professional.

As the flowchart shows, simple curiosity is perfectly served by basic home tests. If you are a serious seller looking to get a fair price, stepping up to an acid kit makes sense. And for those high stakes valuations, professional lab services are the only way to go.
Comparing Your Options
Let’s break down the most common methods side by side to give you an even clearer picture. Each technique offers its own unique balance of precision and accessibility, and knowing what to expect from each one is crucial.
Once you have a good handle on your gold’s purity, the next step is to figure out what it’s worth. You can learn more about how to calculate gold value based on its weight and the live market price.
Comparison of Gold Purity Testing Methods
This table offers a quick comparison of the most common gold testing methods, highlighting their accuracy, cost, and best use cases to help you choose the right approach for your needs.
| Method | Accuracy Level | Cost | Best For |
|---|---|---|---|
| Home Tests (Magnet, Density) | Low to Medium | Free | Initial screening of unknown items or ruling out obvious fakes. |
| Acid Test Kit | Medium to High | $15 to $40 | Verifying karat values for selling scrap gold, jewelry, or coins. |
| Electronic Tester | High | $150 to $600 | Quick, non destructive testing for frequent buyers or sellers. |
| Professional Assay (XRF/Fire) | Very High | $50 to $150+ | Valuing large investments, estate pieces, or resolving disputes. |
Ultimately, the right test depends on what is at stake. For a few old chains, a $20 acid kit is a smart investment. For a potential five figure gold bar, spending $100 on a professional assay is just good sense.
Simple At Home Gold Purity Tests
Before you even think about professional services or pricey kits, there are a few straightforward ways you can get a feel for your gold’s purity right at home. These initial checks are perfect for weeding out the obvious fakes and giving you a baseline idea of what you are holding.
They’re quick, cost nothing, and use basic scientific principles to give you clues about the metal in your hands. While these tests will not spit out a precise karat value, they are an incredibly useful first line of defense. Let’s walk through three of the most effective methods you can try right now.
The Magnet Test: A Quick First Check
First up is the magnet test. This is by far the easiest and fastest way to spot certain types of counterfeits.
Here is the deal: real gold is a non ferrous metal, which means it is not magnetic. If your item snaps right onto a magnet, it’s definitely not solid gold. It almost certainly has a magnetic core, like iron or nickel, that is just hidden under a thin layer of gold plating.
For this to work, you will need a reasonably strong magnet. That flimsy refrigerator magnet probably will not be powerful enough to detect a metal core buried inside a larger piece. Grab a stronger neodymium magnet from a hardware store to get more reliable results.
Simply hold the magnet close to your gold item.
- No reaction? That is a great sign. It means the item is likely made of non magnetic metals, a group that includes gold and its common alloy partners like copper and silver.
- A strong pull: If the item sticks firmly to the magnet, it contains ferrous metals and is not solid gold. Game over for that piece.
- A slight pull: A faint attraction could just be the clasp or another small component. Many jewelry clasps contain a tiny steel spring, which is magnetic. Make sure to test different parts of the item, not just the clasp.
Passing the magnet test does not guarantee your item is real gold. Plenty of fakes are made from non magnetic metals like brass or lead specifically to fool this exact test. Think of it as a great way to rule things out, not to confirm purity.
The Ceramic Scratch Test
Next, let’s try the scratch test. This one relies on observing the color of the streak your item leaves behind when scraped against a hard surface.
Because this method is slightly destructive, you will want to test it on a discreet spot that will not be visible, think the inside of a ring’s band or the back of an earring post. You will need an unglazed ceramic plate or tile. The rough, unfinished bottom of a ceramic mug or bowl works perfectly for this.
Gently but firmly, drag your gold item across the surface of the unglazed ceramic. You should see a fine line of powdered metal left on the plate.
- A golden yellow streak is what you are hoping for. This indicates your item is likely real gold.
- A black or gray streak means it’s not gold and is probably a base metal like brass trying to masquerade as the real thing.
This test is definitely more revealing than the magnet test, but it still just gives a general indication rather than a specific karat value. Different gold alloys can produce slightly different shades of yellow, which can be tough for an untrained eye to interpret. You can learn more about how alloys impact color by exploring the differences between 14k, 18k, and 24k gold.
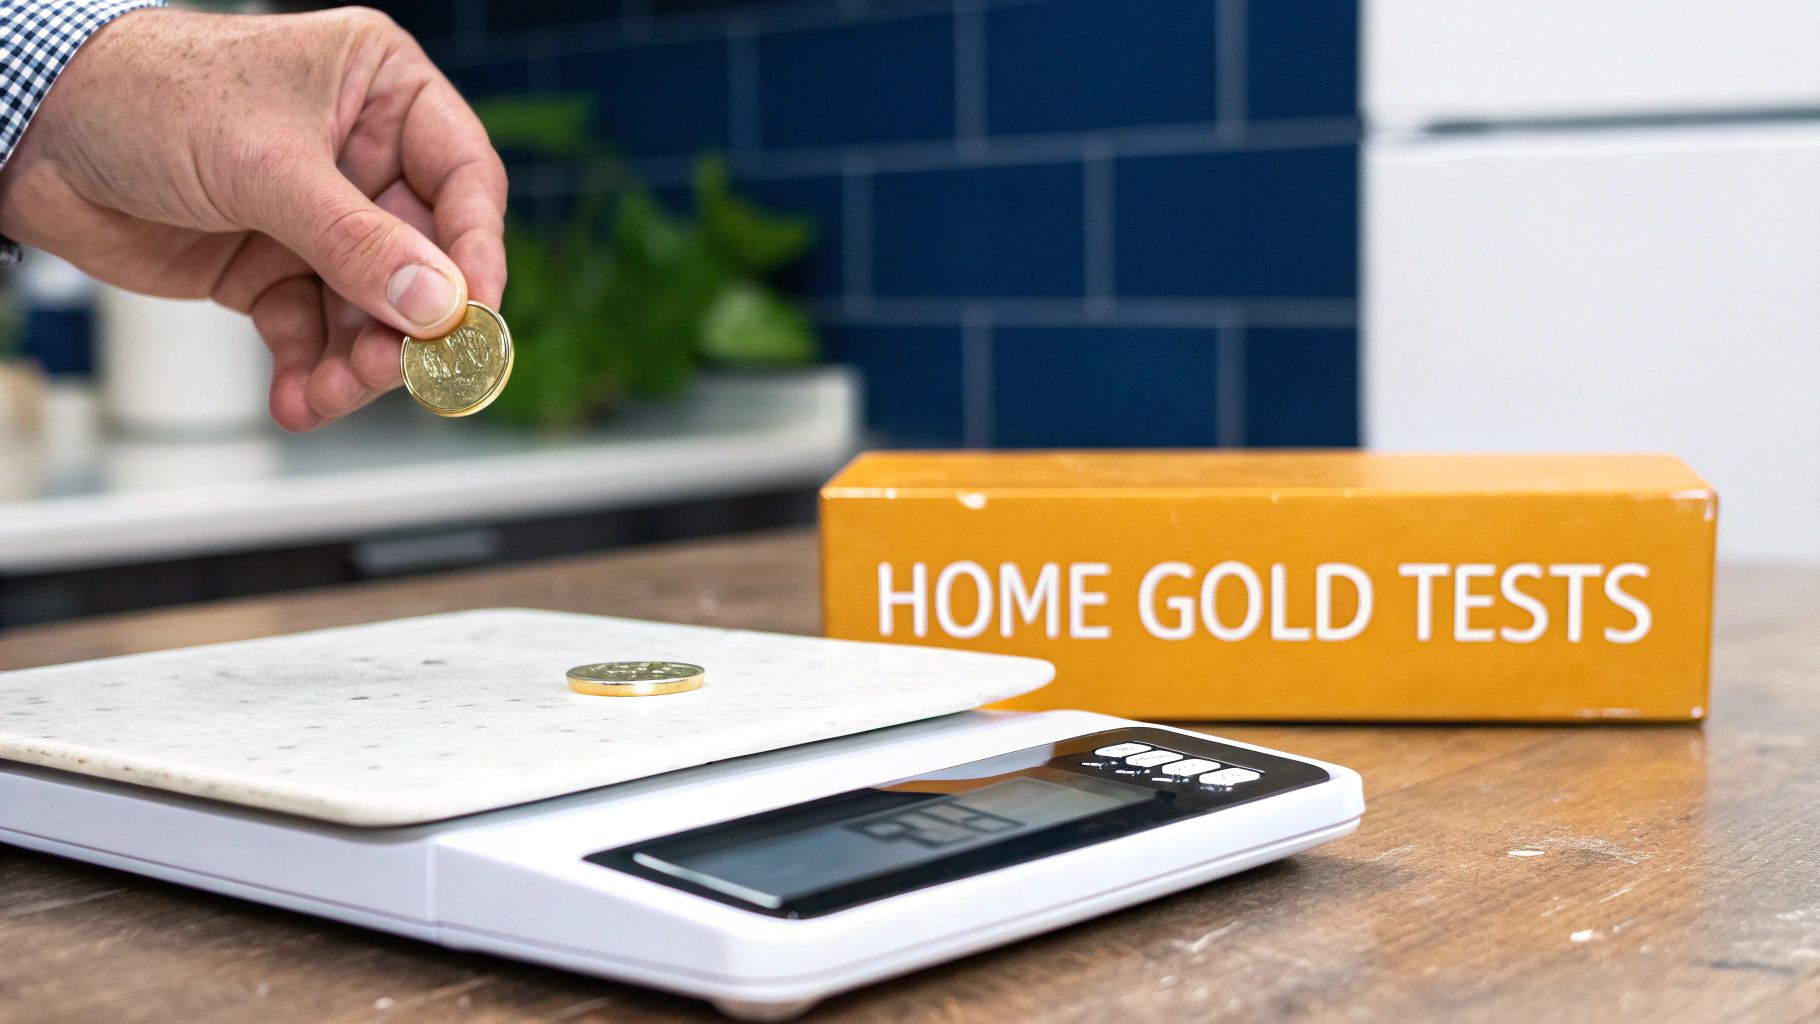
The Density Test: Using Water
For a more scientific approach, you can perform a density test right in your kitchen. Gold is one of the densest metals out there, making it significantly heavier than most common fakes. This test uses Archimedes’ principle to calculate density by comparing the item’s weight in air to its weight while submerged in water.
You will need a sensitive digital scale that can measure in grams (a kitchen or jewelry scale is perfect), a cup of water, and a bit of string.
First, weigh the item in air. Get the dry weight of your gold piece. For our example, let’s say a ring weighs 15.2 grams.
Next, weigh the item in water. Place your cup of water on the scale and press the “tare” or “zero” button to zero it out. Now, suspend the item with the string so it’s fully submerged but not touching the bottom or sides of the cup. The scale will show the weight of the water that was displaced. Let’s imagine this reading is 1.0 gram.
Finally, calculate the density. Just divide the dry weight by the weight of the displaced water. In our example: 15.2 g / 1.0 g = 15.2 g/cm³.
Once you have that number, you can compare it to a standard gold density chart.
| Karat Value | Gold Purity (%) | Typical Density Range (g/cm³) |
|---|---|---|
| 10K | 41.7% | 11.0 to 12.0 |
| 14K | 58.5% | 12.9 to 14.6 |
| 18K | 75.0% | 15.2 to 15.9 |
| 22K | 91.6% | 17.7 to 18.6 |
| 24K | 99.9% | 19.1 to 19.3 |
Our calculated density of 15.2 g/cm³ falls squarely in the range for 18K gold. While this test is surprisingly accurate for solid, simple items, keep in mind that its results can be skewed by hollow jewelry or pieces that have gemstones set in them.
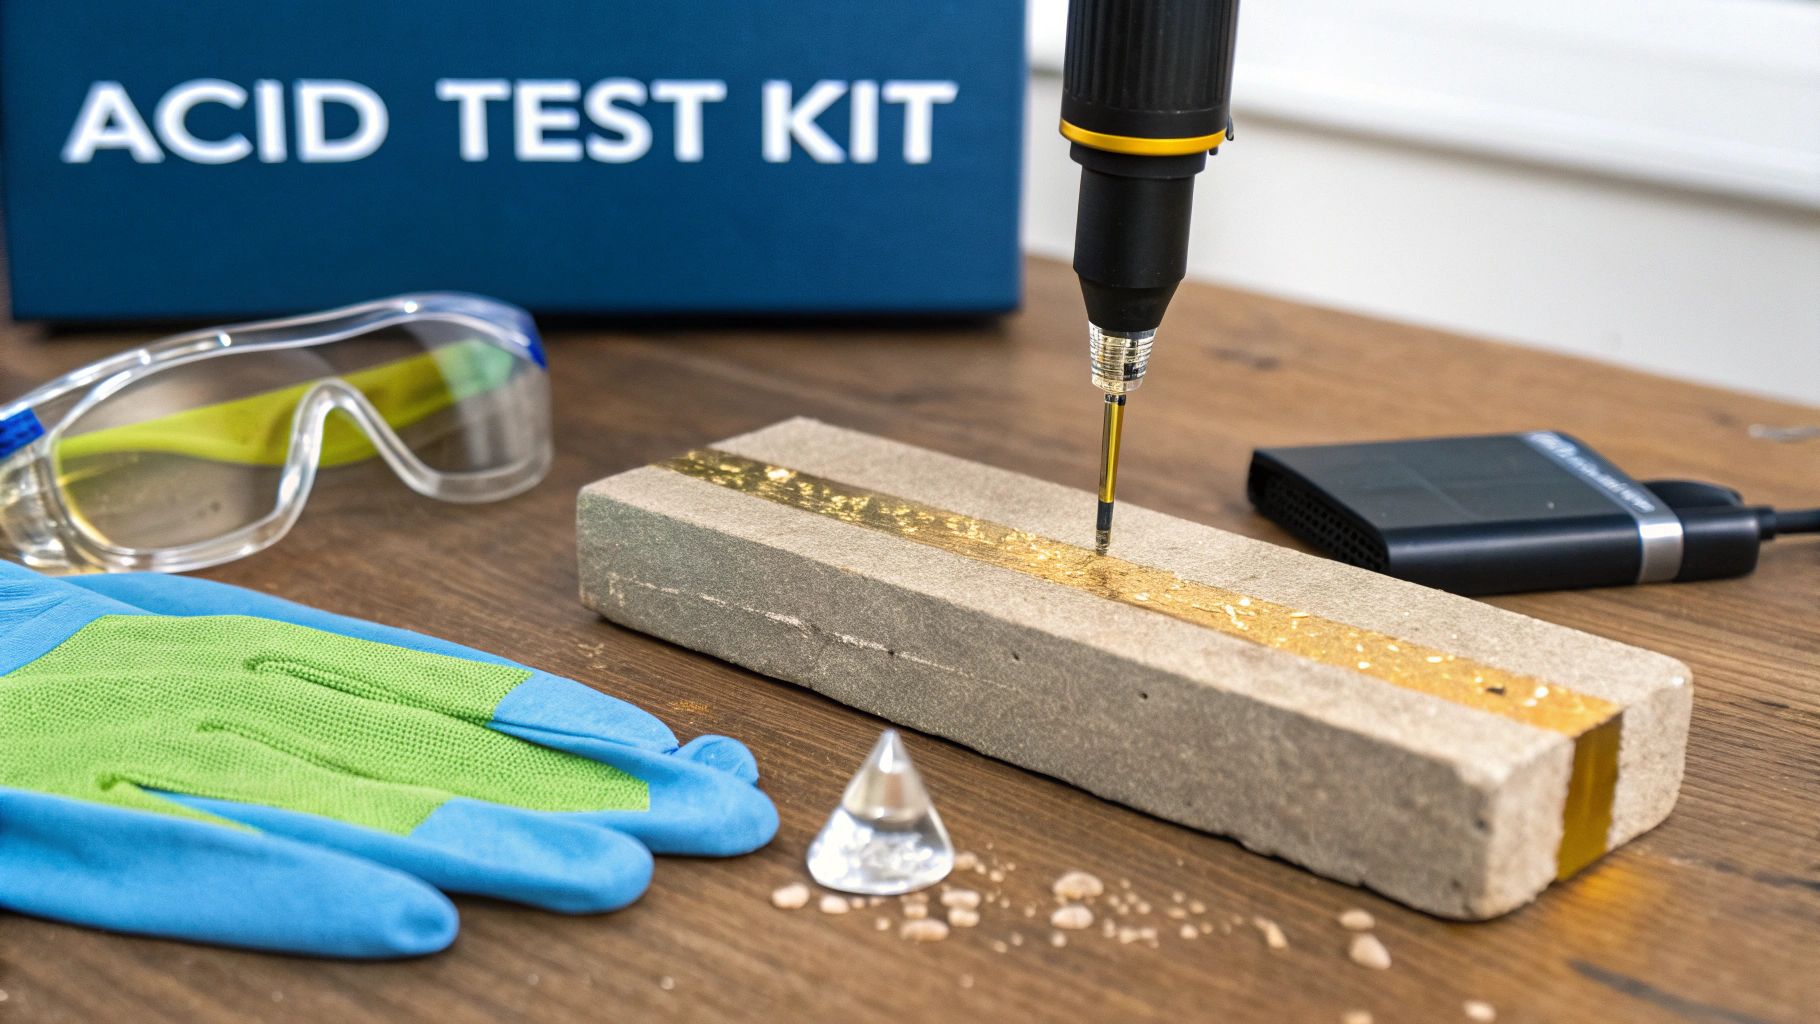
Test Gold Purity With Touchstone and Acid Kit
When the simple home tests just do not cut it, the touchstone and acid kit is your next logical step. It’s a classic method for a reason, offering a fantastic balance between affordability and accuracy that has made it a go to for jewelers and serious gold buyers for centuries. This approach gives you a much clearer picture of your gold’s specific karat value than any initial screening test can.
Unlike a magnet or density test, this technique provides tangible, chemical feedback on your item’s actual composition. It is a bit more involved, sure, but once you get the hang of it, you have a powerful tool for accurately assessing jewelry, coins, and scrap gold. With a little practice, you will be able to confidently tell if that chain is 10K, 14K, or something else entirely.
What Is a Touchstone and Acid Test?
At its core, the touchstone and acid test is a controlled chemical reaction. The “touchstone” itself is a dark, slightly abrasive stone, usually slate or something similar, that lets you scrape off a tiny, almost invisible sample of your gold without damaging the piece.
You just rub the gold item onto the stone, leaving a faint streak of metal behind. Then, you apply a drop of a specific nitric acid solution to that streak. How the metal reacts, or does not react, to the acid is what tells you its purity. The whole thing is a fascinating bit of practical chemistry that delivers clear, visual results.
This technique is a perfect example of a historical method that has absolutely stood the test of time. In fact, the touchstone method is one of the oldest and most historically significant techniques for testing gold, dating back thousands of years. It was later enhanced by the introduction of acid tests to observe chemical reactions more precisely. You can watch this video to see how these ancient gold testing techniques are still used today.
Setting Up Your Testing Station Safely
Before you even think about opening an acid bottle, your first priority is safety. You are working with corrosive materials here, so setting up a dedicated, safe workspace is not optional, it is mandatory.
Here’s what you absolutely need:
- Safety Goggles: Protect your eyes from any accidental splashes.
- Gloves: Nitrile or latex gloves are a must to protect your skin from acid.
- Good Ventilation: Work in a well ventilated area, like near an open window or in a garage, to avoid inhaling any fumes.
- Stable Surface: Use a sturdy table or workbench covered with something protective like old newspaper or a plastic mat to catch spills.
I always keep a small bowl of baking soda mixed with water nearby. This solution neutralizes acid spills quickly and safely. If you happen to get acid on your skin, flush it immediately with plenty of cool water before applying a baking soda paste.
Performing the Test Step by Step
Once your safety station is ready, it’s time to test. Your kit will usually come with the touchstone, several small bottles of acid labeled for different karats (10K, 14K, 18K, etc.), and sometimes a set of gold tipped needles for comparison.
First, pick a discreet spot on your gold item to take a sample. The inside of a ring or the back of a clasp works perfectly. Press down firmly and rub the item on the touchstone to create a clear, thick streak of metal about an inch long.
Next comes the acid. The best approach is to start with the acid that matches the suspected karat of your piece. If you think the ring is 14K, grab the 14K acid solution. Carefully apply a single drop right onto the middle of your gold streak.
Now, you just watch closely for the reaction. The key is to observe how quickly and completely the streak dissolves, if it dissolves at all. This is where you get your answer.
Reading the Acid Test Results
Interpreting the reaction is the most important part of the whole process. The acid for a specific karat is formulated to dissolve any alloy with a lower purity while leaving gold of that karat or higher completely untouched.
| Acid Applied (e.g., 14K) | Observation on the Streak | Interpretation |
|---|---|---|
| No Reaction | The streak remains bright and completely intact. | The item is at least 14K gold or higher. |
| Slow Fading | The streak slowly changes color or begins to fade after a few seconds. | The item is likely a lower karat than 14K (e.g., 10K or 12K). |
| Instant Disappearance | The streak fizzes and dissolves almost immediately. | The item is not real gold or is heavily plated over a base metal. |
If the 14K acid leaves the streak intact, you can wipe the stone clean and repeat the test with the 18K acid on a fresh streak. If the 18K acid dissolves it, you now know your item’s purity is somewhere between 14K and 18K. This bracketing technique is how you can pinpoint the exact karat value with real confidence.
Bring in the High Tech Testers: Electronic and XRF
When you need to test gold quickly and without harsh chemicals, electronic and XRF (X ray fluorescence) gold testers are the tools of the trade.
You’ll see these gadgets all over coin shows, pawn shops, and jewelry stores. Why? Because they deliver fast, reliable data that helps professionals make smart buying decisions on the spot.
How Electronic Testers Work
Electronic gold testers are all about electrical conductivity. They work by sending a tiny, low voltage electrical current through the metal and measuring its resistance. That resistance level corresponds to a specific karat purity.
A good tester will give you a clear reading on its screen, often displaying 10K, 14K, 18K, or 24K. It is a fantastic way to get a quick read, but be aware that heavy gold plating or unusual alloys can sometimes throw off the results.
To get the most accurate reading and avoid being fooled by plated items:
- Prep the surface: Give the metal a quick wipe with an alcohol swab. This removes skin oils and grime that can interfere with the probe’s contact.
- Find bare metal: Place the probe firmly on a clean, inconspicuous spot. Stay away from decorative enamel, solder points, or heavily textured areas.
- Test multiple spots: Take readings from a few different places on the item. If the results are consistent, you can be more confident in the reading. If they vary wildly, you might be looking at a plated piece.
- Calibrate often: Always compare your readings to a known standard or a calibration piece that came with your tester.
The whole process for a single item takes less than 30 seconds. If you are sorting through a large batch of jewelry, an electronic tester can save you hours compared to messing with an acid kit.
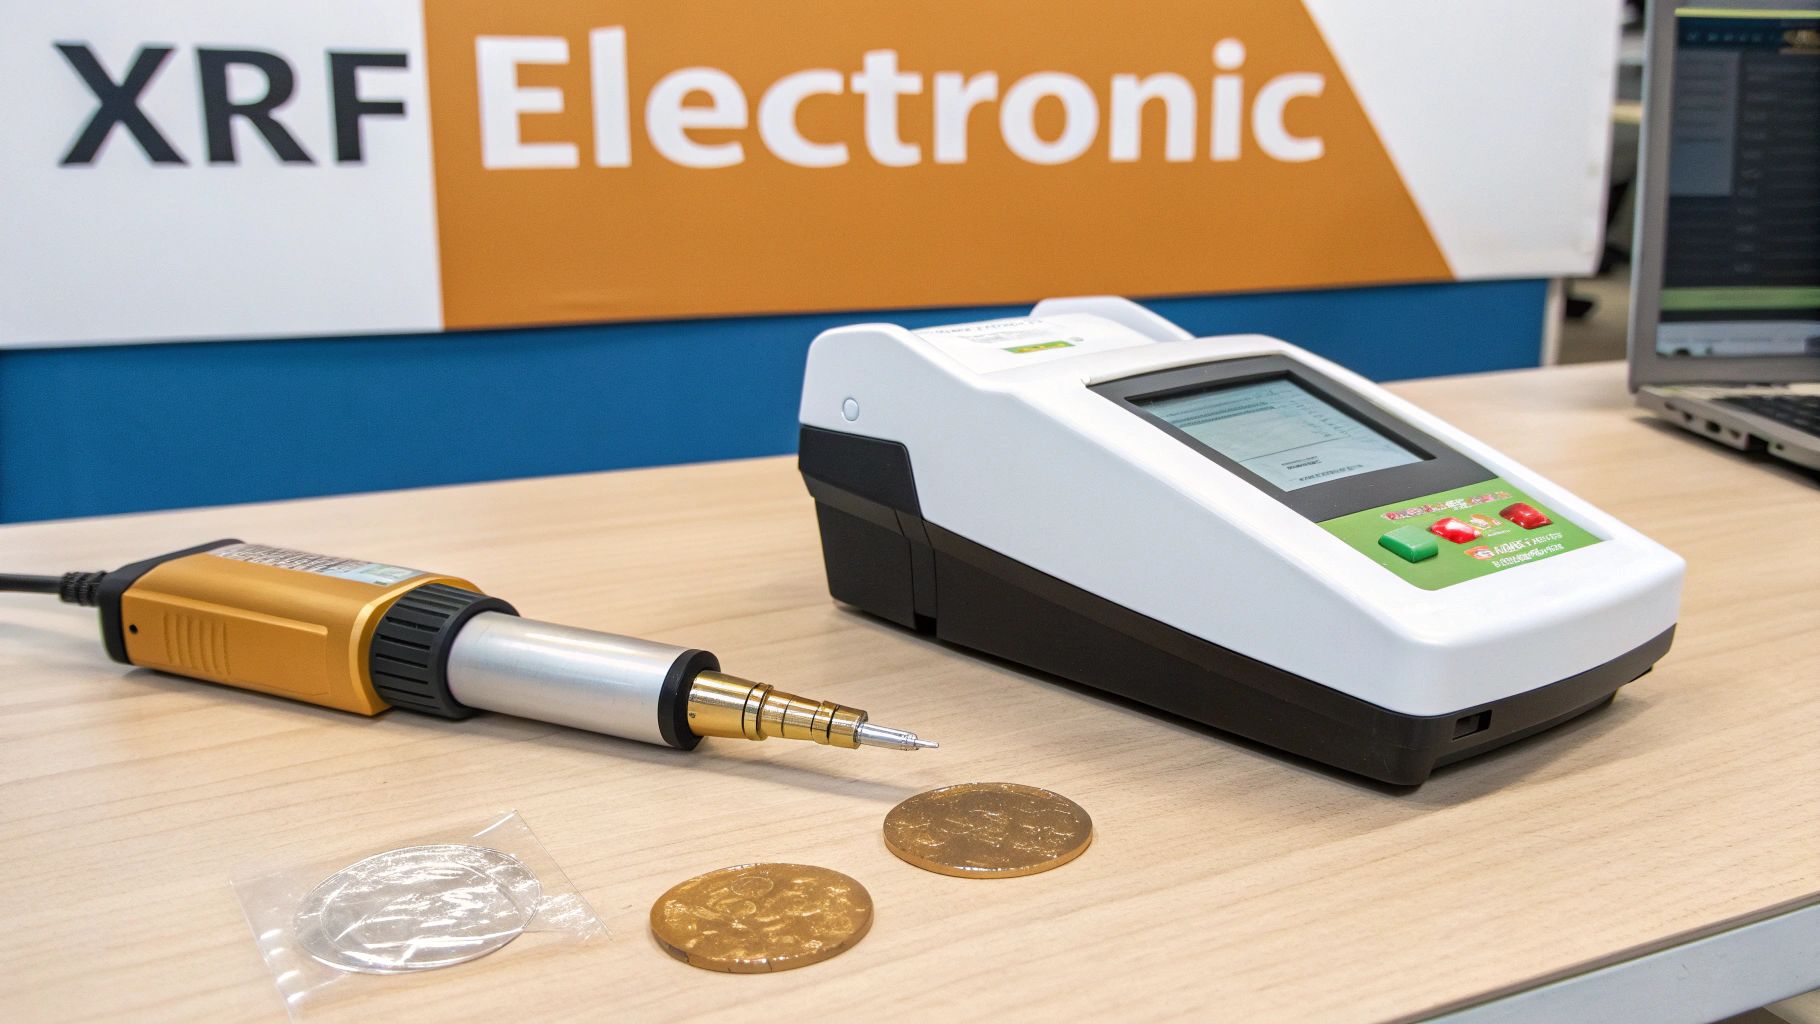
What Is an XRF Analyzer?
For the highest level of non destructive testing, nothing beats an XRF analyzer. These sophisticated devices use X ray Fluorescence to give you a detailed breakdown of an item’s exact elemental composition.
When the machine’s X rays hit the gold alloy, the atoms in the metal get excited and shoot back secondary X rays. The analyzer’s detector captures these secondary rays and instantly identifies which elements are present and in what percentages.
This method is incredibly precise, providing near instant results with an accuracy often greater than 99%. You will see it used in any serious gold market or refinery worldwide. While both electronic and XRF testers are huge improvements over old school methods, they still require a skilled operator and proper calibration to be trusted. You can learn more about the technology behind this from the experts at mgsrefining.com.
Here’s a great visual of a portable XRF unit scanning a coin and showing the elemental percentages right on the screen.
The workflow is dead simple: place the sample, press the scan button, and get a complete readout in under a minute. It’s that easy.
Comparing Precision and Cost
So, which one is right for you? Your choice between an electronic tester and an XRF analyzer really boils down to your budget and how much accuracy you truly need.
Here’s a quick side by side comparison:
| Feature | Electronic Tester | XRF Analyzer |
|---|---|---|
| Accuracy | High (80% to 90%) | Very High (>99%) |
| Cost Range | $150 to $600 | $10,000 to $50,000 |
| Setup Time | Instant | 1 to 2 minutes |
| Portability | Lightweight & handheld | Portable but heavier |
| User Skill Level | Low to medium | Medium to high |
| Consumables | None | No chemicals |
| Maintenance | Probe and battery checks | Calibration & software updates |
Choosing the right tool for the job is an investment. It cuts down on guesswork, builds customer trust, and makes your entire process faster and more profitable.
Real World Use Cases
At a recent coin show, I saw a dealer use a basic electronic tester to screen over 200 suspected silver plated tokens in less than an hour. Doing that with an acid kit would have taken all afternoon.
On the other end of the spectrum, estate buyers often rely on handheld XRF units to verify large lots of mixed metal jewelry without damaging a single piece. One professional I know caught a 22K gold bangle that was mislabeled as 18K, a mistake that would have cost him thousands if he had not scanned it.
Here’s a simple workflow pros use when dealing with large lots:
- Start by cleaning and sorting items by their suspected karat markings.
- Use the XRF to test any suspicious, unmarked, or high value pieces first.
- Switch to the electronic tester for rapid screening of the lower value, clearly marked items.
- Log all your results in a spreadsheet to use during price negotiations.
When to Upgrade Your Equipment
If you are just starting out or only test items occasionally, a quality electronic tester is probably all you need. It’s a reliable and affordable way to get started.
However, if your business involves certifying pieces for customers, handling large volumes, or dealing with high value items where precision is paramount, investing in an XRF will pay for itself very quickly.
Once you have a confirmed purity reading, you can plug it into our Gold Calculator along with the weight to get an instant, accurate melt value. These modern tools give you the speed and clarity needed to test gold with total confidence.
Go Pro: Using Fire Assay and Lab Services
Look, the home testing methods we have covered are great for quick checks and initial sorting. But when the stakes are high, think estate valuations, large bullion trades, or verifying a major purchase, you can not afford to guess. This is when you turn to the professionals.
Lab services cut through all the uncertainty and deliver certified results you can take to the bank.
Fire Assay: The Undisputed Gold Standard
Of all the professional methods, fire assay is the heavyweight champion. It has been the ultimate authority on gold purity for centuries, literally, with roots stretching back to ancient Babylonian civilizations. It remains completely unrivaled in accuracy.
The process is pretty intense: a precisely weighed sample of your gold is melted down with special materials called fluxes. The precious metals are then separated out using lead. It’s a destructive process, but it provides the most precise measurement of purity possible. You can get a deep dive into the science from this GIA research paper.
When Does Precision Matter Most?
Sometimes “close enough” just is not good enough. Even a tiny error of 0.1% in purity can translate into thousands of dollars lost or gained on a large transaction. Professional lab assays provide the kind of robust certification that appraisers, insurers, and legal bodies rely on.
You absolutely need a professional assay for:
- Large investment lots, where minor purity shifts can dramatically impact six figure valuations.
- Legal appraisals that require accredited reports for insurance claims, estate settlements, or court evidence.
- International gold trades, where a standardized certification is essential for clearing customs smoothly.
After a trusted lab confirmed my gold bars at 99.95% purity, I avoided a six figure loss on a bulk purchase. This is a real world example of how much professional verification can matter when dealing with high value gold.
Choosing the Right Assay Office
Not all labs are created equal. You need to find an office that’s not just experienced but also properly accredited. Look for labs that hold ISO 17025 accreditation, as this is a key indicator of quality and competence in testing.
Here’s what to check before sending your samples:
- Verify their ISO 17025 accreditation number on the lab’s website or through the accrediting body.
- Read recent customer reviews to gauge their accuracy, communication, and overall service.
- Confirm their standard turnaround time and ask about rush options if you’re on a deadline.
- Ask about their required sample size so you know exactly what to send.
What to Expect for Cost and Turnaround
Budgeting for a professional assay is straightforward once you know the typical rates. Turnaround can vary from a couple of days for a quick XRF scan to a few weeks for a more complex analysis.
| Service Type | Typical Cost | Turnaround Time |
|---|---|---|
| Fire Assay | $50 to $150 | 5 to 14 days |
| XRF Analysis | $75 to $200 | 1 to 3 days |
| Multi Element Lab Test | $100 to $300 | 7 to 21 days |
A Quick Note on “Destructive Testing”
Remember how fire assay involves melting your gold? That makes it a destructive method. You can not get your original piece back.
Because of this, you should never send a valuable heirloom or an intact piece of jewelry. Instead, provide a representative sample. Labs typically only need between 20 and 50 milligrams for a reliable reading.
- Take small fragments, filings, or a tiny clipping from a discreet spot.
- If you have scrap pieces from the same batch, send one of those.
- Store your sample in an airtight vial or bag to prevent any contamination before shipping.
How to Package and Ship Your Samples
Your sample needs to arrive safely and uncontaminated. Do not just toss it in an envelope.
- Place the sample in a small, sealed pouch or vial, then wrap it securely in bubble wrap.
- Make sure you include a completed submission form from the lab with your contact details and a clear description of the item.
- Use a sturdy box and add “Fragile” or “Lab Sample” labels.
- Always choose a courier that offers tracking and insurance, especially for valuable items.
Making Sense of Your Lab Report
When you get your results, the assay certificate will provide a wealth of information. You will see the exact gold purity, the composition of the fluxes used, and a list of any detected impurities.
Pay close attention to the margin of error, which is often stated as ±0.01%. This tells you the precision of the result.
Your report should include:
- The recorded purity in fineness (e.g., 999.5) and its karat equivalent.
- The date of the test and the signature of the certified assayer.
- A reference to the testing standard used (like ASTM or an equivalent).
A detailed lab report is more than just a confirmation of purity; it is a powerful negotiation tool. When you know exactly what you have, you can confidently use our Gold Calculator to determine its real time melt value and secure a fair offer.
Got Questions About Gold Purity Testing? We’ve Got Answers.
When you start digging into how to test your gold, a lot of questions pop up. From trying to protect a family heirloom to figuring out what a “750” stamp really means, getting the right answers is crucial.
This FAQ section cuts through the noise and gives you practical, straightforward advice for the most common questions we hear. Whether you are a first time seller or just getting curious about your collection, these answers will help.
Can I Test Gold Purity Without Harming My Jewelry?
Yes, absolutely. You can use several non destructive methods that are perfectly safe for valuable or sentimental pieces. The Magnet Test and the Density Test, for instance, will not leave a single mark.
If you need a more accurate result without causing any damage, a portable electronic tester or an XRF analysis are fantastic options. It is best to avoid using acid kits on the finished surfaces of high value items, though you can always test a tiny, inconspicuous spot if you must.
Always start with the gentlest tests first, like the magnet or density method, especially for delicate items. For better certainty without any risk, an electronic tester gives you a quick karat reading without leaving a scratch.
Are Hallmarks and Stamps on Gold Items Reliable?
Hallmarks like “14K” or “750” are usually a good starting point. In many countries, these stamps are regulated and tend to be accurate indicators of purity. However, they can be forged by counterfeiters, or they might simply wear away over decades of use.
Think of a hallmark as a strong clue, not definitive proof. It is always a smart move to back it up with at least one other testing method, particularly when you are dealing with a pricey piece or an item from an unfamiliar source.
What Is the Difference Between Karat and Fineness?
Both karat and fineness measure the exact same thing, the purity of the gold, just on different scales. It is a lot like measuring temperature in Fahrenheit versus Celsius.
- Karat divides gold purity into 24 parts. So, 24K is pure gold, while 18K means the item is 18 parts gold and 6 parts other metals.
- Fineness measures purity in parts per thousand. Pure 24K gold has a fineness of 999.9, while an 18K piece is equivalent to a fineness of 750.
The higher the number on either scale, the more gold you have got.
| Karat | Fineness | Gold Content |
|---|---|---|
| 10K | 417 | 41.7% |
| 14K | 585 | 58.5% |
| 18K | 750 | 75.0% |
| 24K | 999 | 99.9% |
What Should I Do If My Test Results Conflict?
If your home tests are giving you mixed signals, do not just guess. A common scenario is an item passing the magnet test but failing the density test, this could point to a convincing, non magnetic fake.
When in doubt, the best thing to do is get a professional opinion. An XRF analysis or a fire assay from a reputable lab or refiner will give you the definitive answer you need. This clears up any confusion and protects your investment. Understanding the value of different purities is also helpful, and you can learn more about what scrap gold is worth once you have a verified karat.